Addrly User Manual
Master professional address label printing with our comprehensive guide. From setup to advanced features, everything you need to know.
Table of Contents
Updated November 2025
Introduction
What is Addrly?
Addrly is a modern, cross-platform desktop application designed for efficient batch address label printing. It provides an offline-first solution with intelligent address parsing, bulk processing capabilities, and support for multiple printer protocols.
Key Features
Intelligent Address Parsing
Automatically recognizes and parses North American address formats
Rich Text Editor
WYSIWYG label editing with formatting controls
Multi-Protocol Support
TSPL, ZPL, EPL, CPCL, and Windows printing
Address Management
Save, search, and manage your address database
Print History
Track all your printing activities
Multi-Language Interface
Support for 11 languages
Offline Operation
All data stored locally, no internet required
Batch Printing
Efficiently print multiple labels with a streamlined workflow
QuickBooks Integration
Optional integration with QuickBooks Online
System Requirements
Windows
Windows 10 or higher, 4GB RAM minimum, 200MB free disk space
macOS
macOS 10.15 or higher (Intel or Apple Silicon), 4GB RAM minimum, 200MB free disk space
Linux
Ubuntu 18.04+, CentOS 7+, or Fedora 30+, 4GB RAM minimum, 200MB free disk space
Getting Started
Installation
Download the installation package for your operating system from the official website or distribution channel.
Run the installer and follow the on-screen instructions.
Launch Addrly from your desktop or start menu.
First Launch
When you first launch Addrly, you'll see the splash screen followed by the main interface. The application will automatically detect available printers on your system.
Pro Tip
Before printing your first label, we recommend configuring your default sender address in Settings. This will make it easier to create return address labels.
3. Main Features Overview
Application Structure
The application consists of five main sections accessible from the sidebar:
- • Home: Create and print labels
- • Address Manager: Manage your address database
- • Print History: View past printing activities
- • Settings: Configure application preferences
Navigation
Use the icon sidebar on the left to navigate between different sections. Click on any icon to switch to that section. The active section will be highlighted.
Main Application Window:
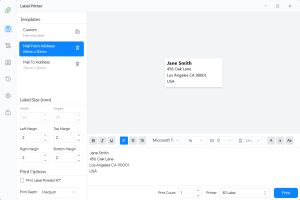
4. Home Page - Creating Labels
Overview
The Home page is where you create, edit, preview, and print address labels. It features a split-pane layout with address input on the left and label preview on the right.
Step-by-Step: Creating Your First Label
4.1 Entering Address Information
1. In the address input area, you can either:
- Type the address directly
- Paste an address from your clipboard
- Click "Parse" to automatically parse the address into structured fields
2. The address editor allows you to edit each line of the address. You can:
- Add or remove lines
- Format text (bold, italic, underline)
- Adjust alignment (left, center, right)
- Change font family and size
- Adjust letter spacing and line height
4.2 Formatting Your Label
The formatting toolbar provides the following options:
- Bold (B): Make selected text bold
- Italic (I): Make selected text italic
- Underline (U): Underline selected text
- Alignment: Left, Center, or Right align text
- Font Family: Choose from system fonts or built-in fonts
- Font Size: Adjust text size (8-72 points)
- Letter Spacing: Control spacing between characters
- Line Height: Adjust spacing between lines
- Text Transform: Normal, Uppercase, Lowercase, or Capitalize
- Text Color: Choose text color using the color picker
4.3 Selecting a Template
Addrly comes with several pre-configured label templates:
- Small Label: 50mm × 25mm
- Medium Label: 70mm × 30mm
- Large Label: 100mm × 50mm
- Custom: Define your own dimensions
Select a template from the template dropdown, or choose "Custom" to set your own width and height in millimeters.
4.4 Label Size Settings
In the Label Size section, you can configure:
- Width (mm): Label width in millimeters
- Height (mm): Label height in millimeters
- Left Margin (mm): Horizontal offset from the left edge
- Top Margin (mm): Vertical offset from the top edge
- Print Count: Number of copies to print
- Rotate 90°: Print the label rotated 90 degrees
- Print Depth: Low, Medium, or High (affects print quality)
4.5 Preview
The preview pane on the right shows a real-time preview of how your label will look when printed. The preview updates automatically as you make changes to the address or formatting.
Note: If the text exceeds the label size, you'll see a warning. You can choose to continue printing or adjust the text size to fit.
4.6 Printing
1. Select a printer from the "Printer" dropdown. If no printers are configured, click "Go to Settings" to add one.
2. Review your label in the preview pane.
3. Click the "Print" button to start printing.
4. A success message will appear when printing starts.
4.7 Saving Addresses
After creating a label, you can save the address for future use:
1. Click "Save Address" button
2. Enter a name for this address (e.g., "John Smith - Home")
3. Click "Save" to store the address in your address database
5. Address Manager
Overview
The Address Manager allows you to store, search, edit, and manage all your saved addresses. This is particularly useful if you frequently print labels for the same recipients.
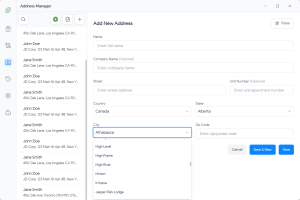
Add New Address Interface:
Viewing Addresses
The Address Manager displays all your saved addresses in a list. Each address shows the recipient's name and basic information. Click on any address to view its full details in the right pane.
Searching Addresses
Use the search box at the top to quickly find addresses by name, company, city, or any other field. The list filters in real-time as you type.
Adding a New Address
1. Click the "Add New Address" button (plus icon)
2. Fill in the address form with the following fields:
- Name: Recipient's full name (required)
- Company Name: Company or organization (optional)
- Street: Street address (required)
- Unit Number: Apartment, suite, or unit number (optional)
- City: City name (required)
- State: State or province (required)
- Zip Code: Postal code (required)
- Country: Country name (required)
3. Click "Save" to add the address, or "Save & New" to save and immediately start adding another address.
Parsing Address from Text
You can quickly add addresses by pasting address text:
1. Click "Paste from Clipboard" or click the "Parse Address" button
2. Paste or type the address text in the dialog
3. Click "Parse" - the address will be automatically parsed into the form fields
4. Review and edit the parsed fields if needed, then save
Editing an Address
1. Click the edit icon (pencil) next to the address you want to modify
2. Make your changes in the form
3. Click "Save" to update the address
Deleting an Address
1. Click the delete icon (trash) next to the address
2. Confirm the deletion in the dialog
Importing from QuickBooks
If you have QuickBooks Online connected, you can import customer addresses directly:
1. Click the "QuickBooks" button in the Address Manager toolbar
2. You'll be taken to the QuickBooks Import page
3. Select the customers you want to import
4. Click "Import Selected" to add them to your address database
Duplicate Prevention: The system automatically prevents duplicate imports by checking QuickBooks customer IDs. If a customer has already been imported, it will be skipped.
Printing from Address Manager
You can print a label directly from the Address Manager:
1. Select an address from the list
2. Click the "Print" button in the address details pane
3. You'll be redirected to the Home page with the address pre-filled
5.1. Importing from QuickBooks
Overview
The QuickBooks Import page allows you to import customer addresses from your QuickBooks Online account. This feature requires that you have already connected your QuickBooks account in Settings.
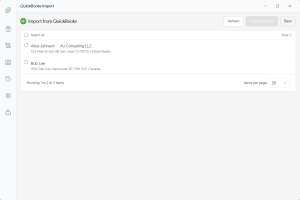
QuickBooks Import Interface:
Accessing the Import Page
You can access the QuickBooks Import page in two ways:
- From the Address Manager: Click the "QuickBooks" button in the toolbar
- Direct navigation: The page is available at the QuickBooks Import route
Importing Customer Addresses
1. Ensure you are connected to QuickBooks (see Settings → QuickBooks tab)
2. The page will automatically load your QuickBooks customers
3. Review the list of customers displayed
4. Select the customers you want to import by checking the boxes next to their names
5. Use "Select all" to quickly select all customers, or select them individually
6. Click "Import Selected" to add the selected customers to your address database
7. After successful import, you'll be redirected back to the Address Manager
Duplicate Prevention
The import system uses QuickBooks customer IDs to prevent duplicate entries:
- Each QuickBooks customer has a unique ID
- When importing, the system checks if a customer with the same ID already exists
- If a duplicate is found, the existing address is returned instead of creating a new one
- This ensures you won't accidentally create multiple entries for the same customer
Note: If you need to update an imported address, you can edit it manually in the Address Manager. Re-importing the same customer will not overwrite your manual changes.
Refreshing Customer List
Click the "Refresh" button to reload the customer list from QuickBooks. This is useful if you've added new customers in QuickBooks since the last import.
Connection Status
If you're not connected to QuickBooks, the page will display a warning message with a button to navigate to the QuickBooks connection settings. Your connection status is automatically saved and will persist across application restarts.
Batch Print
Print multiple address labels efficiently from the Address Manager.
Batch Print Interface:
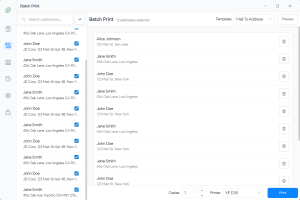
Print Preview:
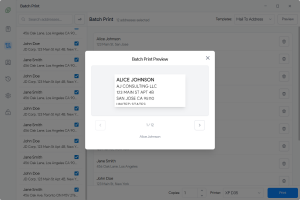
Using Batch Print
Select Addresses In Address Manager, hover over an address and click the ✓ checkmark icon on the right. To select all, click the Select All button (double checkmark icon) in the top toolbar.
Open Batch Print Once items are selected, click the Batch Print button (printer with checkmark icon) that appears in the top toolbar.
Configure Settings In the panel, select your target Printer and the Template you wish to use. Set the Default Copies for all items, or adjust individual copy counts in the list below.
Preview & Print Click "Preview" to verify how the labels will look. When ready, click "Start Batch Print" to begin the printing process.
Batch Print Options
-
Select All / Deselect All: Quickly toggle all items in the batch print list
-
Individual Copies: Set different copy counts for each address as needed
-
Progress Tracking: Monitor print progress with real-time success/fail counts and status updates
Print History
Access via the sidebar Print History icon. View all past printing activities.
Features
- • View Details: Select a record to see address, printer, and timestamp
- • Search: Filter history by address or printer name
- • Reprint Label: Click to send to Home with pre-filled settings
- • Save to Address: Save a print record as a new address entry
- • Delete: Remove individual records or clear all history
⚠️ Warning: Deleting print history cannot be undone.
Overview
The Print History page keeps a record of all your printing activities, including the address printed, printer used, and timestamp. This is useful for tracking and reprinting labels.
Viewing Print History
The print history is displayed in a list format, showing the most recent prints first. Each entry displays:
- Address information
- Printer name
- Date and time of printing
Searching Print History
Use the search box to find specific print records by address, printer name, or date.
Reprinting a Label
1. Select a print record from the list
2. Click the "Reprint Label" button in the details pane
3. You'll be redirected to the Home page with the address and settings pre-filled
4. Review and click "Print" to reprint the label
Deleting Print Records
You can delete individual print records or clear all history:
- Delete Single Record: Select a record and click the delete button, then confirm
- Delete All History: Click "Delete All History" button and confirm the action
Warning: Deleting print history cannot be undone. Make sure you want to delete before confirming.
Settings
Access via the sidebar Settings icon. Three tabs: General, Printer, and QuickBooks.
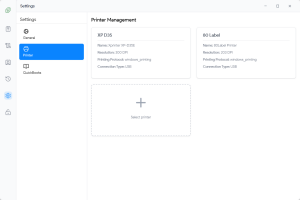
Settings Panel:

Printer Management:
7.1 General Settings
Language
Change the interface language from the dropdown. Supported languages include:
- English
- 简体中文 (Simplified Chinese)
- Español (Spanish)
- Français (French)
- Deutsch (German)
- Italiano (Italian)
- Português (Portuguese)
- Русский (Russian)
- 日本語 (Japanese)
- 한국어 (Korean)
- العربية (Arabic)
The language change takes effect immediately. Don't forget to click "Save" to persist your settings.
Default Sender Address
Configure your default return address that will be used when creating return address labels:
1. Fill in all address fields (Name, Street, City, State, Zip Code, Country)
2. Optionally add a Company Name and Unit Number
3. Click "Save" to store your sender address
You can also click "Print" to immediately create a label with your sender address.
7.2 Printer Management
Adding a Printer
1. Go to Settings → Printer tab
2. Click "Add Printer" button
3. Fill in the printer information:
- Nickname: A friendly name for this printer (e.g., "Office TSC Printer")
- Brand: Printer manufacturer (TSC, Zebra, Eltron, etc.)
- Model: Printer model number
- Resolution: Printer resolution (e.g., 203 DPI, 300 DPI)
-
Printing Protocol:
Select the protocol your printer uses:
- TSPL: For TSC thermal label printers
- ZPL: For Zebra label printers
- EPL: For Eltron label printers
- CPCL: For Cognitive label printers
- Windows Printing: For generic Windows-compatible printers
-
Connection Type:
How the printer is connected:
- USB: Direct USB connection
- COM Port: Serial port connection (select COM port and baud rate)
- WiFi/LAN: Network connection (enter IP address and port)
- Device Name: Select the actual device from the detected devices list
4. Click "Save" to add the printer
Testing a Printer
After adding a printer, you can test the connection:
1. Select the printer from the list
2. Click the "Test" button
3. A test label will be sent to verify the printer is working correctly
Editing a Printer
Click the edit icon next to a printer to modify its settings. Make your changes and click "Save".
Deleting a Printer
Click the delete icon next to a printer to remove it from your configuration. This action cannot be undone.
Refreshing Printer List
Click the "Refresh" button to scan for newly connected printers on your system.
7.3 QuickBooks Integration (Optional)
Addrly can optionally integrate with QuickBooks Online to import customer addresses. This integration uses OAuth 2.0 with PKCE for secure authentication.
Connecting to QuickBooks
1. Go to Settings → QuickBooks tab
2. (Optional) Configure an OAuth Proxy Server URL if you're using a server-based OAuth setup. Leave empty to use direct connection.
3. Click "Connect to QuickBooks"
4. Complete the OAuth 2.0 authentication process in your browser. You'll be redirected to QuickBooks to authorize the application.
5. Once authorized, you'll be redirected back to Addrly and the connection will be established
6. Your connection status will be saved and automatically restored when you restart the application
Importing Customers
After connecting to QuickBooks, you can import customer addresses:
1. Go to Address Manager
2. Click the "QuickBooks" button in the toolbar
3. Select the customers you want to import and click "Import Selected"
OAuth Proxy Server (Advanced)
If you're using a server-based OAuth setup, you can configure a proxy server URL:
1.
In the QuickBooks settings, enter your OAuth proxy server URL (e.g.,
https://yourdomain.com)
2. Click "Set" to save the server URL
3. The OAuth flow will now be proxied through your server
Privacy Note: QuickBooks integration is completely optional. You can disable network features entirely if you prefer to keep all data local. All QuickBooks tokens and data are stored locally on your computer. The connection status persists across application restarts.
Disconnecting from QuickBooks
To disconnect your QuickBooks account:
1. Go to Settings → QuickBooks tab
2. Click "Disconnect"
3. Confirm the disconnection. This will remove all QuickBooks authentication tokens from your local storage.
8. Printing
Print Process
When you click the "Print" button, Addrly:
- Renders the label design to a high-resolution bitmap
- Converts the bitmap to the appropriate printer command format (TSPL, ZPL, etc.)
- Sends the commands to the selected printer via USB, COM port, or network
- Records the print job in your print history
Print Quality Settings
The "Print Depth" setting affects print quality:
- Low: Faster printing, lighter print
- Medium: Balanced speed and quality (recommended)
- High: Slower printing, darker and more durable print
Print Troubleshooting
Printer Not Responding
- Check that the printer is powered on and connected
- Verify the connection type matches your setup (USB, COM, or Network)
- Try refreshing the printer list in Settings
- Test the printer connection using the "Test" button in Settings
Print Quality Issues
- Adjust the "Print Depth" setting (try Medium or High)
- Check that the label size matches your physical label dimensions
- Verify the printer resolution setting matches your printer's actual resolution
- Clean the printer head if prints appear faded or streaky
Text Not Fitting on Label
- Reduce the font size
- Adjust letter spacing and line height
- Use a larger label template
- Remove unnecessary text or formatting
Label Alignment Issues
- Adjust the "Left Margin" and "Top Margin" settings
- Check that the label is properly loaded in the printer
- Calibrate your printer if it has a calibration function
9. Troubleshooting
Application Issues
Application Won't Start
- Check that your system meets the minimum requirements
- Try restarting your computer
- Reinstall the application if the problem persists
- Check for error messages in system logs
Address Parsing Not Working
- Ensure the address follows a standard format (Name, Street, City, State, Zip)
- Try manually editing the parsed fields if automatic parsing fails
- Check that all address components are on separate lines
Preview Not Updating
- Try clicking in the address editor to refresh the preview
- Check that you haven't exceeded the label size limits
- Restart the application if the preview remains frozen
Settings Not Saving
- Make sure you click the "Save" button after making changes
- Check that you have write permissions in the application data directory
- Try restarting the application and re-entering your settings
Data Issues
Addresses Disappearing
- Check the search filter - you may have a search query active
- Verify that addresses weren't accidentally deleted
- Check the application data directory for database files
Print History Not Showing
- Ensure you've actually printed at least one label
- Check that print history wasn't cleared
- Try refreshing the page or restarting the application
Frequently Asked Questions
General Questions
Q Is Addrly free?
A Addrly offers a 15-day free trial with full functionality. After the trial period, check the official website for licensing options.
Q Does the application require an internet connection?
A No, Addrly works completely offline. All data is stored locally on your computer. Internet is only required for the optional QuickBooks integration.
Q Is my data secure?
A Yes, all your data is stored locally on your computer. No address information or personal data is ever uploaded to the internet. The application uses Rust's memory safety features and local database encryption.
Q Can I use Addrly on multiple computers?
A Yes, you can install Addrly on multiple computers. However, address data and settings are stored locally on each computer and are not automatically synchronized.
Printing Questions
Q Which printer brands are supported?
A Addrly supports TSC, Zebra, Eltron, Cognitive, and other brands that use TSPL, ZPL, EPL, or CPCL protocols. It also supports generic Windows-compatible printers.
Q How do I know which printing protocol to use?
A Check your printer's documentation or manufacturer website. Common protocols:
- TSC→ TSPL
- Zebra→ ZPL
- Eltron→ EPL
- Cognitive→ CPCL
If unsure, try TSPL first as it's the most common for thermal label printers.
Q Can I print multiple copies of the same label?
A Yes, use the "Print Count" setting on the Home page to specify how many copies you want to print.
Technical Questions
Q Where is my data stored?
A All data is stored locally in the application data directory:
%APPDATA%\Addrly\
~/Library/Application Support/Addrly/
~/.config/Addrly/
Q Can I customize the label templates?
A Yes, you can create custom label sizes by selecting "Custom" from the template dropdown and entering your desired width and height in millimeters.
Support & Resources
Getting Help
If you encounter issues not covered in this manual, here are some resources to help you:
Documentation
Check the official documentation website for detailed guides and tutorials.
Community Forum
Visit the community forum to connect with other users and share experiences.
Technical Support
Contact technical support via email for personalized assistance.
GitHub Repository
Check the GitHub repository for known issues, updates, and source code.
Version Information
Thank you for using Addrly!
We hope this manual helps you make the most of the application. If you have suggestions for improving this documentation, please let us know.
Need more help with Addrly?
Our support team is here to help you succeed with professional address label printing.